|
Postpartum hysterectomy
can be subtotal unless the cervix and lower uterine segment are
involved. Total hysterectomy may be necessary in the case of a tear
of the lower segment that extends into the cervix or bleeding after
placenta praevia.
• Review for
indications.
• Review operative
care principles and start an IV infusion.
• Give a single dose
of prophylactic antibiotics:
- ampicillin 2 g IV;
- OR cefazolin 1 g
IV.
• If there is
uncontrollable haemorrhage following vaginal delivery, keep in mind
that speed is essential. To open the abdomen:
- Make a midline
vertical incision below the umbilicus to the pubic hair, through the skin
and to the level of the fascia;
- Make a 2–3 cm
vertical incision in the fascia;
- Hold the fascial
edge with forceps and lengthen the incision up and down using scissors;
- Use fingers or
scissors to separate the rectus muscles (abdominal wall muscles);
- Use fingers to
make an opening in the peritoneum near the umbilicus. Use scissors to
lengthen the incision up and down in order to see the entire uterus.
Carefully, to prevent bladder injury, use scissors to separate layers
and open the lower part of the peritoneum;
- Place a bladder
retractor over the pubic bone and place self-retaining abdominal
retractors.
• If the delivery
was by caesarean section, clamp the sites of bleeding along the
uterine incision:
- In case of
massive bleeding, have an assistant press fingers over the aorta in
the lower abdomen. This will reduce intraperitoneal bleeding;
- Extend the skin
incision, if needed.
SUBTOTAL (SUPRACERVICAL) HYSTERECTOMY
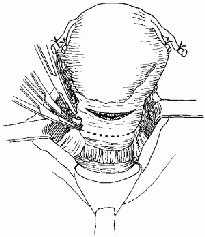
• Lift the uterus out of the abdomen and gently pull to maintain traction.
• Doubly clamp and cut
the round ligaments with scissors (Fig P-54). Clamp and cut the pedicles,
but ligate after the uterine arteries are secured to save time.
FIGURE P-54 Dividing the round ligaments
• From the edge of the cut round ligament, open the anterior leaf of the
broad ligament. Incise to:
- the point where
the bladder peritoneum is reflected onto the lower uterine surface in
the midline; or
- the incised
peritoneum at a caesarean section.
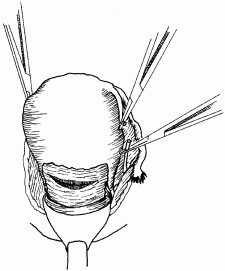
• Use two fingers to
push the posterior leaf of the broad ligament forward, just under the tube
and ovary, near the uterine edge. Make a hole the size of a finger in the
broad
ligament, using scissors. Doubly clamp and cut the tube, the ovarian
ligament and the broad ligament through the hole in the broad ligament
(Fig P-55).
The ureters are close
to the uterine vessels. The ureter must be identified and exposed to avoid
injuring it during surgery or including it in a stitch.
FIGURE P-55 Dividing the tube and ovarian
ligaments
• Divide the posterior leaf of the broad ligament downwards towards the
uterosacral ligaments, using scissors.
• Grasp the edge of
the bladder flap with forceps or a small clamp. Using fingers or scissors,
dissect the bladder downwards off of the lower uterine segment. Direct the
pressure downwards but inwards toward the cervix and the lower uterine
segment.
• Locate the uterine
artery and vein on each side of the uterus. Feel for the junction of the
uterus and cervix.
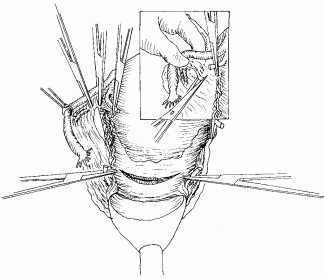
• Doubly clamp across
the uterine vessels at a 90̊ angle on each side of the cervix. Cut and
doubly ligate with 0 chromic catgut (or polyglycolic) suture (Fig P-56).
FIGURE P-56 Dividing the uterine vessels
• Observe carefully for any further bleeding. If the uterine arteries
are ligated correctly, bleeding should stop and the uterus should look
pale.
• Return to the
clamped pedicles of the round ligaments and tubo-ovarian ligaments and
ligate them with 0 chromic catgut (or polyglycolic) suture.
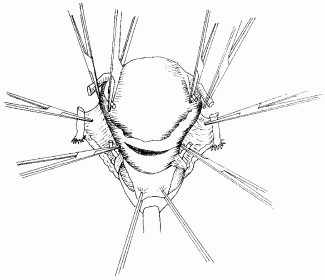
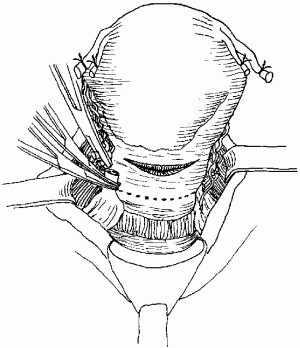
• Amputate the uterus
above the level where the uterine arteries are ligated, using scissors
(Fig P-57).
FIGURE P-57 Line of amputation
• Close the cervical stump with interrupted 2-0 or 3-0 chromic catgut (or
polyglycolic) sutures.
• Carefully inspect
the cervical stump, leaves of the broad ligament and other pelvic floor
structures for any bleeding.
• If slight
bleeding persists or a clotting disorder is suspected, place a drain
through the abdominal wall. Do not place a drain through the cervical
stump as this can cause postoperative infection.
• Ensure that there is
no bleeding. Remove clots using a sponge.
• In all cases, check
for injury to the bladder. If a bladder injury is identified,
repair the injury.
• Close the fascia
with continuous 0 chromic catgut (or polyglycolic) suture.
Note: There is
no need to close the bladder peritoneum or the abdominal peritoneum.
• If there are
signs of infection, pack the subcutaneous tissue with gauze and place
loose 0 catgut (or polyglycolic) sutures. Close the skin with a delayed
closure after the infection has cleared.
• If there are no
signs of infection, close the skin with vertical mattress sutures of
3-0 nylon (or silk) and apply a sterile dressing.
TOTAL HYSTERECTOMY
The following additional steps are required for total hysterectomy:
• Push the bladder
down to free the top 2 cm of the vagina.
• Open the posterior
leaf of the broad ligament.
• Clamp, ligate and
cut the uterosacral ligaments.
• Clamp, ligate and
cut the cardinal ligaments, which contain the descending branches of the
uterine vessels. This is the critical step in the operation:
- Grasp the ligament
vertically with a large-toothed clamp (e.g. Kocher);
- Place the clamp 5
mm lateral to the cervix and cut the ligament close to the cervix,
leaving a stump medial to the clamp for safety;
- If the cervix
is long, repeat the step two or three times as needed.
The upper 2 cm of the
vagina should now be free of attachments.
• Circumcise the
vagina as near to the cervix as possible, clamping bleeding points as they
appear.
• Place haemostatic
angle sutures, which include round, cardinal and uterosacral ligaments.
• Place continuous
sutures on the vaginal cuff to stop haemorrhage.
• Close the abdomen
(as above) after placing a drain in the extraperitoneal space near the
stump of the cervix.
POSTOPERATIVE CARE
• Review postoperative care principles.
• If there are
signs of infection or the woman currently has fever, give a
combination of antibiotics until she is fever-free for 48 hours:
- ampicillin 2 g IV
every 6 hours;
- PLUS gentamicin 5
mg/kg body weight IV every 24 hours;
- PLUS metronidazole
500 mg IV every 8 hours.
• Give appropriate
analgesic drugs.
• If there are no
signs of infection, remove the abdominal drain after 48 hours.
• Offer other health
services, if possible.
|